Saturday, March 9, 2013

The Answer is in Your Hands...

Throughout their career, both Vincent Van Gogh  and Leonardo da Vinci have done amazing work, yet people still have a question up in their heads, which one is better?

Vincent Van Gogh

Vincent Willem Van Gogh was a Dutch post-impressionist artist, famous for his work in the 1800s. Although he had died at a very young age, it wasn't until his death that his paintings had become famous. During his career, Van Gogh's work was only known by a few, and appreciated by even less. He started to draw at an early age, but didn't pick up painting until his late 20's, completing some of his best-known works during the last two years of his life, before he died at the age of 37, on March 30, 1853. In just over a decade, Van Gogh had produced more than 2,100 artworks, consisting of 860 oil paintings and over 1,300 watercolors, drawings, sketches and paints. Some of his paintings include the famous "Starry Night", his collection of self portraits, "Bedroom in Arles", and "Starry Night over the Rhone."
Information from: http://en.wikipedia.org/wiki/Vincent_van_Gogh

Leonardo da Vinci

Leonardo di ser Piero da Vinci was an Italian Renaissance polymath:  painter, sculptor, architect, musician, mathematician, engineer, inventor, anatomist, geologist, cartographer, botanist, and writer. He is widely considered to be the greatest painter of all time, and perhaps the most diversely talented person ever to have lives. Living to the age of 67, he had an interest in many things, but is still known widely for his best known paintings, that include the "Mona Lisa". Due to his new techniques, which were constant and frequently disastrous, though, only about fifteen of his paintings have survived. Throughout his art career, his interest in science had influenced him. 
Information from: http://en.wikipedia.org/wiki/Leonardo_da_vinci

Chart
Still don't know who to chose? Here's a chart comparing the two artists.


Vincent Van GoghLeonardo da Vinci
Famous after deathFamous before he died.
Over 2100 paintingsOnly 15 paintings have survived to this day
Lived to 37Lived to 67
Focused on mainly artFamous for art but had many interests
Famous for Starry NightFamous for Mona Lisa


Top Three Paintings by Van Gogh and da Vinci

  1. Starry Night- Vincent Van Gogh
     1. Mona Lisa- Leonardo da Vinci
     2. A Wheatfield with Cypresses- Vincent Van Gogh
     2. The Last Supper- Leonardo da Vinci
     3. Irises- Vincent Van Gogh
     3. Head of a Young Women with Tousled Hair- Leonardo da Vinci
   
The Decision
Now that you've heard both sides of this argument, it's your time to choose. Whose the better artist out of the talented duo? Vincent Van Gogh or Leonardo da Vinci? Take the poll on the top right hand corner or comment below leaving your choice.

Thursday, February 28, 2013

Should Creativity be Considered Illegal?

A bit inspiration, acknowledgement, and culture... should that really be illegal? Throughout the years, people have been arguing if graffiti, or street art should be legal, or remain illegal. Should it considered vandalism or creativity? Disrespect, or meaningful? It's up to the world to decide. The decision starts with you.

Reasons to be Legal

Throughout the years, many consider street art as "tasteful, expressive, and beautiful pieces of art, which adds culture to bland landscapes."  The meaningful pieces of art have been seen almost everywhere, and as many admire the pieces by the unknown artists, other shun them away. In one form or another, street art has been a part of human life since the ancient times. These artists, probably being "invisible " at one point get their own sense of territory with their meaningful and inspiring pieces. Many of these pieces are very appropriate, and at many times tell a story that relate to many others. Although street art is still considered illegal today, I feel that there are many more serious crimes today, and a person shouldn't be charged, or prisoner  for trying to find the voice inside of them. I feel that the consequence is way too serious, I mean, wouldn't chalk on a sidewalk be just as much of a crime? 

Reasons to be Illegal

On the other hand, others describe graffiti as vandalism, disrespect for others, and a "waste of time and paint." While many pieces of street art are inspirational, others feel that there is still too many inappropriate pieces of street art that are covered with curse words. One of the biggest reasons that people refuse to accept street art is because it decreases value of buildings, as well as costs millions for the city to clean up. This sometimes unattractive art causes these people to refuse to look deeper into these pieces. The mood, feeling, and story behind it. While they still admire modern art, they forget that most of the true artist are still yet to be discovered. 

Pros and Cons

Here's a chart listed with arguments defending both sides... so what do you think? Do you think street art should remain illegal, or do you think that we should accept the culture that has been with us since the dawn of man?


                Pros of graffiti                         Cons for graffiti
Makes a “statement”Decreases value of building
Unusual, eye-popping imagesSome “expressions”
Part of human culture, been part of the world since ancient timesCan lead to other crimes, especially for the youth
exciting to the eyevandalism, and can lead to violence
Reveals talentCosts thousands of dollars to clean up


The Decision

Now you've seen both sides of this argument. While it's clear to me that graffiti should be legal, as long as there are some restrictions, it's not my decision, it's yours. Take the poll on the side of this post, or just comment below, telling if you feel if graffiti should be legal or not.

Tuesday, February 19, 2013

Roses from Plastic Spoons

Hey everyone, so as my title says, today's tutorial is about How to make Roses from Plastic Spoons. I know that many of you all aren't expecting great outcomes for this craft, but all I can say is that you might surprise yourself! The finishing piece is actually really impressive, and the picture to the left shows an example of it. The rose is very realistic-looking, and a perfect home décor for any house or occasion! I definitely recommend that you try this craft more than once if you get off with a rough start, and just remember: no rose is perfect, and it isn't always going to look exactly like the picture! I hope that you're now as excited about this craft as I am, let's get started!

 
First off, I would just like to give the credit for the "producer" of this video, which in this case is FaveCraftsVideo  so if you enjoyed this video, be sure to check out her channel on YouTube. This craft is truly unique and amazing, so I hope you plan on trying it out. Next off, I'd just like to say, that this craft requires the use of flames, so if you use parent's permission and you may also want an adult to supervise you during the craft. One tip I have for you is to use the same colored spoons throughout the rose, to give it a more realistic feel. A colorful rose is fine, if you're not aiming toward that goal. I'm sorry that I didn't post this up during Valentine's Day, but it's still a great craft! Feel free to comment, critique, suggest, and opinionate in the comment section below! That's all for now, bye!

Friday, February 15, 2013

Tree of Life

The tree of life has been a very important and symbolic in both terms of religion and beliefs for many people throughout the world. With many areas having their own "trees", the common known fact is that it's close to many of us. Today's craft is once again a jewelry tutorial. This time, we are going to learn how to make a Tree of Life pendant. For those of you who don't know what the Tree of Life looks like, the picture above is an example of the Tree of Life. Anyway, I'm excited to start going with this craft, so let's learn!

 
So first of all, I'd like to give credit to the person who made this video. This video was by YrDesign, so if you enjoyed this tutorial, make sure to check out her YouTube channel. I feel that this craft is very unique and can be very personalized (shape of tree, color of beads, etc.) Anyways, I hope you all liked the video as much as I did. Feel free to comment below, because the comment section is always open for opinions, suggestions, and feedback. Stay tuned for next week's post, and see you next time!

Friday, February 8, 2013

Spray Paint Techniques

Hey everyone today I'm going to talk about different techniques in spray paint. These techniques are really amazing, and impressive. It's really great and not as time consuming as you might think... The results of these techniques coming together are awesome, so let's get started. The video that I'm about to show you is from YouTube, and is bySEIfilms, so if you enjoy this, please check out his page on YouTube. Many of these techniques that you will learn through this post are very simple, but create unique designs. Let's start!

 
The three basic techniques that are demonstrated throughout this post are: reflections, making trees, and using stencils. It's actually quite interesting what you can do in just a few minutes that can create something extraordinary. The stencil used in this tutorial can simply be made with poster paper, and achieved in a few seconds. Warning: this piece of art calls for a lot of space an is messy, so make sure you lay out some newspapers before you begin. Anyway, I hope you all enjoyed this tutorial as much as I did! Please feel free to comment on your opinion about this post as well as suggest ideas for future posts! That's all for now, bye!

Thursday, January 31, 2013

Valentine's Day... Two Gift Ideas

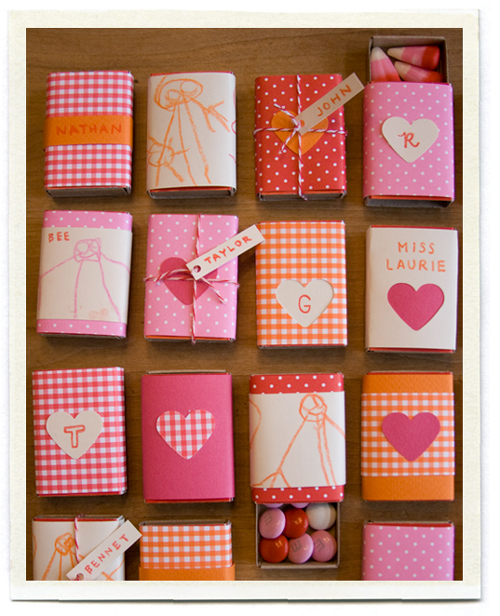
Hey guys, so today I decided to post a few homemade tutorials for Valentine's Day, since many like to take part in giving gifts to the people you care about. Anyway, the two crafts that I will show you are called Matchbox Valentines and Handmade Conversation Heart Soaps. The first one, Matchbox Valentines are very, very simple, and cute! It is pretty much a covered up matchbox, which is empty, until you fill with something nice, like candy, letters, etc. The second one, on the other hand, takes a bit longer. I hope you guys are excited for today's post, let's begin.

Matchbox Valentine
Materials:
-matchbox (bigger than the mini ones, the bigger, the better)
-any piece of paper (wrapping paper, construction paper, etc.)

Steps
1. Take a decent sized matchbox and empty it. Then, hold it the long way, one end facing you.
2. Take it in your hand and pick up your paper in the other. From one edge, wrap it around the matchbox. If your paper is too small, grab a bigger piece.
3. Open up matchbox and fill it up with desired contents.
4. If desired, wrap ribbon around box. This benefits if you want to tuck in a note under the ribbon. Enjoy!
Here, to the right, are finished results of this craft.


Homemade Conversation Heart Soap
instructions copied from: http://www.marthastewart.com/266875/heart-shaped-soap
Tools and Materials
Nonstick 9-inch square pan
Heart-shape cookie cutter
Glass measuring cup
Glycerin soap
Bench scraper
Soap colorant or food coloring
Spray bottle filled with rubbing alcohol
Cutting board
Needle nose pliers
1/8-inch metal letter stamps
Masking tape
Heart-Shaped Soap How-To We used a 2-inch cookie cutter (1 inch high) and 2 1/2 pounds of glycerin soap-sold at crafts stores-to make 16 hearts.

Steps
1. Depending on your equipment, yields may vary. To determine how much glycerin you'll need, fill pan with water to 1/4 inch below height of cookie cutter; pour water into measuring cup. Record amount; discard water.
2. Cut soap into small pieces with bench scraper; fill measuring cup. Microwave on medium heat until melted; stir. Add soap and heat until you've reached the water amount. Add colorant; stir. Pour liquid into pan. Spray with alcohol to eliminate bubbles.
3. Let harden at room temperature, 2 hours. Freeze 10 minutes.
0206_msl_heartsoap_l.jpg
4. Turn upside down onto cutting board. Create soaps with cookie cutter; pull cutter out with pliers if it sticks. Tape stamps together to form words, and imprint on soap, applying light, even pressure.
To the right are pictures of the finished results.


I hope you all enjoyed this post and these tutorials as much as I do. Please comment on your thoughts of this post, and suggestions on future ones!

Friday, January 25, 2013

Paracord Bracelet

Hey guys, so today I'm going to show you how to make a paracord bracelet. For those of you who don't know what that is, of how it looks, the picture on the right is an example of this bracelet. As you can see, this craft incorporates a lot of knots, and patient. Don't get me wrong; this craft has very simple steps, but it can also very easily be messed up! Warning: this craft uses the use of flames, so please be very careful of ask other to do that step for you.  Okay, let's get started!

 
I feel that this bracelet is very cute, and goes great with any casual outfit. In my opinion, I think that even though this video comes along with three tutorials, the first one is easiest. Remember, that you don't need specific colors for this craft. This bracelet make the perfect gift from the heart for Valentine's Day, Birthdays, and just about any occasion. I hope you all enjoyed this craft and plan on trying it out! Feel free to comment and suggest ideas as well asstate your opinion! That's all for now, bye!!