Thursday, January 31, 2013

Valentine's Day... Two Gift Ideas

Hey guys, so today I decided to post a few homemade tutorials for Valentine's Day, since many like to take part in giving gifts to the people you care about. Anyway, the two crafts that I will show you are called Matchbox Valentines and Handmade Conversation Heart Soaps. The first one, Matchbox Valentines are very, very simple, and cute! It is pretty much a covered up matchbox, which is empty, until you fill with something nice, like candy, letters, etc. The second one, on the other hand, takes a bit longer. I hope you guys are excited for today's post, let's begin.

Matchbox Valentine
Materials:
-matchbox (bigger than the mini ones, the bigger, the better)
-any piece of paper (wrapping paper, construction paper, etc.)

Steps
1. Take a decent sized matchbox and empty it. Then, hold it the long way, one end facing you.
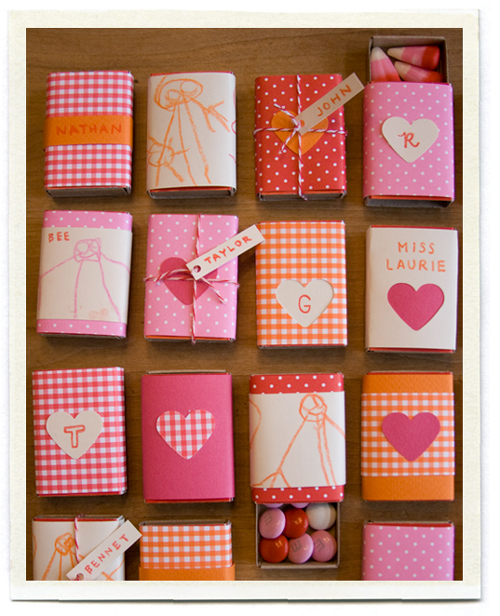
2. Take it in your hand and pick up your paper in the other. From one edge, wrap it around the matchbox. If your paper is too small, grab a bigger piece.
3. Open up matchbox and fill it up with desired contents.
4. If desired, wrap ribbon around box. This benefits if you want to tuck in a note under the ribbon. Enjoy!
Here, to the right, are finished results of this craft.


Homemade Conversation Heart Soap
instructions copied from: http://www.marthastewart.com/266875/heart-shaped-soap
Tools and Materials
Nonstick 9-inch square pan
Heart-shape cookie cutter
Glass measuring cup
Glycerin soap
Bench scraper
Soap colorant or food coloring
Spray bottle filled with rubbing alcohol
Cutting board
Needle nose pliers
1/8-inch metal letter stamps
Masking tape
Heart-Shaped Soap How-To We used a 2-inch cookie cutter (1 inch high) and 2 1/2 pounds of glycerin soap-sold at crafts stores-to make 16 hearts.

Steps
1. Depending on your equipment, yields may vary. To determine how much glycerin you'll need, fill pan with water to 1/4 inch below height of cookie cutter; pour water into measuring cup. Record amount; discard water.
2. Cut soap into small pieces with bench scraper; fill measuring cup. Microwave on medium heat until melted; stir. Add soap and heat until you've reached the water amount. Add colorant; stir. Pour liquid into pan. Spray with alcohol to eliminate bubbles.
3. Let harden at room temperature, 2 hours. Freeze 10 minutes.
0206_msl_heartsoap_l.jpg
4. Turn upside down onto cutting board. Create soaps with cookie cutter; pull cutter out with pliers if it sticks. Tape stamps together to form words, and imprint on soap, applying light, even pressure.
To the right are pictures of the finished results.


I hope you all enjoyed this post and these tutorials as much as I do. Please comment on your thoughts of this post, and suggestions on future ones!

Friday, January 25, 2013

Paracord Bracelet

Hey guys, so today I'm going to show you how to make a paracord bracelet. For those of you who don't know what that is, of how it looks, the picture on the right is an example of this bracelet. As you can see, this craft incorporates a lot of knots, and patient. Don't get me wrong; this craft has very simple steps, but it can also very easily be messed up! Warning: this craft uses the use of flames, so please be very careful of ask other to do that step for you.  Okay, let's get started!

 
I feel that this bracelet is very cute, and goes great with any casual outfit. In my opinion, I think that even though this video comes along with three tutorials, the first one is easiest. Remember, that you don't need specific colors for this craft. This bracelet make the perfect gift from the heart for Valentine's Day, Birthdays, and just about any occasion. I hope you all enjoyed this craft and plan on trying it out! Feel free to comment and suggest ideas as well asstate your opinion! That's all for now, bye!!

Friday, January 18, 2013

DIY Earring Holder!

Hey girls, how many times have you had your earrings scattered all over the place, and always say to yourself, that one day you'll take care of the mess? I've been there. Looking for a cute and affordable earring holder can be tough, so how about making one which is quick, and easy, and best of all, under $5! This craft is very simple and cheap. The picture on the right is how this craft will turn out. I feel that the earring holder looks fairly well, especially considering the small amount of cash needed to achieve this look. Let's get started!

Here's the website that has instructions on how to make this craft: http://www.alittletipsy.com/2011/04/diy-under-5-make-earring-holder.html

I feel that this makes the perfect gift for any occasion, whether it be a birthday, or Valentine's day, or just something to say that you love that person. The materials are very common: Splatter Screen, Hot Glue, etc., and can be found at stores such as Dollar Tree and Target. The background can vary as well as the style, depending on the type of fabric that you use. Remember, the important thing is that it's YOURS, so it should represent YOU! Creativity and uniqueness is key to any piece of art, so nothing has to be a precise way! I hope you all liked this craft as much as I did, and plan n trying it out! Bye!

Friday, January 11, 2013

Origami Magic Ball

Hey guys, so to the right are pictures of an origami magic ball. This is in fact, a craft that I've been working on for the last couple of days, and so far, I can honestly now say that I'm terrible at origami! Yes, I know that origami calls for precise directions, and total patience, as well as a good understanding on tasks. That aside, I know that many of your are origami lovers, so this post is for you. Also, if you're not great at origami, like me, take this as a challenge. Try it, I dare you to. Anyway, this ball not only looks cool, but is fun to play with! It's squishy, and tiny, and tons of fun! Do you have what it takes to make this ball? Let's find out...      


So above are two videos. The first one is the normal, classic magic ball. But the second one is a mini magic ball, which makes it easier to understand the steps, and is a little easier to achieve. They both require massive amounts of patience, and will probably take you more than one try to succeed. This craft also calls for a minimum of materials, and they are commonly found in households. Make sure that you clear your schedule before you start this project, because this will not be a quick project. This project is not easy, and that's a fat, so don't gt frustrated if it doesn't work the first few times. That's all for now, bye!

If you give up, here's a website where yo can buy the magic ball for $4: 
http://www.etsy.com/listing/102792362/origami-magic-ball?utm_source=googleproduct&utm_medium=syndication&utm_campaign=GPS&gclid=CNGw0YDi4bQCFcuZ4AodWg8Axg

Friday, December 28, 2012

Sharpie: Uncap What's Inside: #2

Hey guys, before I start today's post I would just like to say that I hope you had a very Merry Christmas filled with joy and laughter. Anyway, I'd just like to start off with something bigger today, and something that was done by someone who definitely had a lot of time on his hands. For most people, a sharpie marker is off-limits of going anywhere near their car, but for artist Chris Dunlop,it's the perfect touch for his 1999 Ford Mustang GT. He, for one, is definitely not afraid of making mistakes, and his incredible results show that he made his sharpie's well spent. It's definitely clear that standing out is not a problem for Chris, and the car is both unique and creative. Looking at the pictures, I want you to think. Look at the sharp clean lines. The abstract work. And the amazing results of using something as simple as a black sharpie.

 As for me, the car is amazing, and so is the fact that it's a masterpiece of just two neutral colors. I think that it teaches you that to make art, it doesn't matter if you have dozens of colors of just one. In fact, I feel that the fewer the amount of colors, the more interesting the piece looks. I just love all the small detail and effort that shows on every inch of the car. Now I want you to look at the picture below. Do you see the fine details between the arrows? See how the arrows just pop out from the rest of the piece. I feel that the car just has so much o look at, even though it is made up of only 2 colors. Now that I've told you my opinion about the car, I would like to hear your! Just tell me anything that you think about when you see the car, or what you feel is nice and unique about the piece in the comments below! That's all for now, bye!

Monday, December 24, 2012

Sharpie: Uncap What's Inside

Hey guys, I back to talk to you about personalizing some of the gifts for you, or your special someone. Lately, I've been obsessing over Toms shoes, and I just thought that it would be great if you could get some designs for the same price as the classic ones, which also has a touch of your personality in it. For shoes like converse, you can just do it online, but you can only choose from the online varieties; but are they exactly what you would call perfectly unique? Today, as well as my next few posts, I will show you the amazing creativity of a Sharpie marker, and as the logo says, we will uncap what's inside! Sharpie's come in many different varieties and colors, so you will always find the one that you're looking for! The best color to start with is a white canvas` (like shown above), because then you have a greater range of colors that will show on the shoe. Don't worry if you aren't the best at drawing; I will be giving advice and tips on making simple designs to succeed turning cute shoes into completely unique ones, with just a matter of a few minutes to hours. Let's get started!

Tips:
- Being a beginner, you might want to start with an old pair of shoes... just for practice.

- Think of something that you feel deeply about, or just freestyle! Either way, don't think too much, the results will just come together without you trying!

- Have a color combination that compliments each other, like the picture shown on the left. It will become easier now that you have at least an idea what colors you want!

-Every mistake you make can easily be fixed, just be creative!

Here's a video to demonstrate designing a shoe:
 
 
Now I know that the shoes in the video aren't Toms, and I would just like my point to be that any shoes will do in this project. These shoes in the video are $8.99 at Wal-Mart, which is about 1/5 the price of Toms! The video is by drstrangeclock, so if you liked this video, make sure to check her out on You Tube! I really think that designing your own shoes represents your personality, and can turn really cheap-looking shoes into a piece of art! If I were you, I would buy some shoes from somewhere else, like Wal-Mart, Target, even Forever 21, and then decorate them, so that you won't have to spend as much money. Although, buying cheaper shoes is a good idea, I would just like to tell you that Tom's donate to a really good cause and donate a pair of shoes to a child who doesn't have one for everyone bought (which is why they are pretty expensive.) Anyway, that's all for now. I hope you liked my post, and if you have anything to tell me, then write it in the comment section below! Bye!


Thursday, December 20, 2012

Decorating the Christmas Tree

Hello everyone! I'm back, with, finally another art related post! This tutorial that I'll be showing you today, is another Christmas related craft, and it is very much something that you can hang on the Christmas tree! This is also, coincidentally a green project, which can go a long way. I know that ornaments aren't very expensive these days, but wouldn't your tree be so much special with some homemade decorations? The ornament that I'll be showing you today, is very simple and takes about a maximum of about 5 minutes to make. The craft calls for a minimum of materials and is a perfect craft to keep kids busy. So if you want to make something like the craft continued, keep on reading.


I thought that this video that I found on You Tube was really interesting, especially since its such a green project. I really feel that the ornament gives a nice Christmas feel and it would be perfect for any tree. The materials that this craft calls for are probably just scattered around your house already! For the paper, anything is fine, from this paper that you decorate yourself, to spare Christmas cards. I hope you like this craft as much as I do, and hopefully try it out! Please let me know what you think about this post in the comments section below! That's all for now...Merry Christmas!