Tuesday, May 28, 2013
Recycled Nail Polish Jewelry

Friday, April 19, 2013
Homemade Collage!
I hope you really are excited about this project! I'm going to show you how I would make a collage through steps. First, I would take a colorful paper, bigger than printing paper, but not a full poster board. Then, I would get a bunch of pictures, all different sizes, and print some out online, including photos, scenery, and clipart. Everything put on, should have a meaning for you, so really try to make it speacial. I would also get some construction paper and lay it on the clear poster board to add some color. After the construction paper is on, I'd lay down the larest pictures first, and then overlap with the smaller oes, to make an imperfect, and fun design! I hope this helped, but if you want another set of instructions, try the link below!
http://www.ehow.com/way_5848005_homemade-picture-collage.html
Friday, April 12, 2013
Decorate Your Phone Case!
Galaxy Phone Case
One of the cutest fashion statements of this year has been the galaxy design. It's also very cute and easy to do on your phone case. It only takes about an hour or two, but it's really worth it. All you need is a black phone case, and some nail polish colors like blue and purple that you will dab on with a makeup sponge. The video below will demonstrate how to properly achieve this look. It's by principessa3x, so if you like this video, check out her channel on YouTube.
Freestyle!
Saturday, April 6, 2013
Pillow Decoration Ideas!
Hey everyone, I know that in my last few posts I've been discussing how to put some spark in you bedroom with the walls on the message and flower lampshade. So first off, if you haven't checked out those posts, I hope you do now. Next I'd like to introduce today's topic, which is going to accent your bedroom and really going to bring it to life. Today I will be showing you all ways to decorate your pillows with household materials that I'm sure you'll have. This time, I'll be doing a bunch of ideas, so I hope I mention one that is perfect for you! Also, before we start, I'd just like to say that you will need to think creatively to succeed. For example, if the project calls for ribbon, fabric or even recycling your old clothes could work. Let's begin! (Also, I won't be telling you specific topics, I'll give a few examples and you could decide what to do with them.)
Buttons!
 Buttons are adorable, especially when it comes to decorations! All you need is a bunch of these from clothes, or anywhere else you can find them! I would recommend that you use different sizes, to make it look as fun and cute as possible! The picture on the right is a great example on how to use these buttons. To stick the buttons on, use super glue. Remember: You'll need plenty of these to create a picture, so try getting some from the store.
Lace!
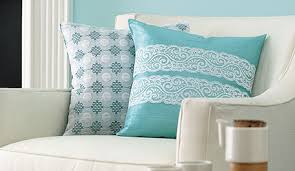 Give your pillow an elegant, romantic feel with inches of lace-ribbon. You just need to trim it to your preference, and apply it on! Remember: you can never turn wrong with this project, because everything is done to your preference! You may accessorize the pillow after the lace is applied. For example, a thin black ribbon across the center will be a great finishing touch, as well as some rhinestones to match your personality. Just remember to have fun with it!
Felt!
 Last but not least, felt will enhance your pillows to reflect your personality. From butterflies, to trees, to just about anything, this one is most likely the most fun to use out of the three. These pillows are great to match with fun prints for children's rooms and nurseries. Also, add an elegant feel with a more sophisticated design. The picture on the right is a perfect example on a quick and cute design using felt. This one is actually creating a 3-D effect, and looks very professional. This actually may cost up to $50 in a store but can easily made for less than $15 at home.Again, you may use super glue to stick them on, or if you want, you may sew them on.
That's all for now, I hope you enjoyed this weeks post, and share your thoughts in the comment section below!
Buttons!
Lace!
Felt!
That's all for now, I hope you enjoyed this weeks post, and share your thoughts in the comment section below!
Friday, March 22, 2013
Flower Lampshade
Hey everyone, so today is another DIY on how to make a flower lampshade. This craft is adorable and illuminating, so I hope you like it as much as I do! The flower lampshade is also very simple to do, making the task of making the lampshade easier. The lampshade is a great decoration for bedrooms, hallways, and just about any place in the house! Some basic materials that you will need for this craft is super glue, a bunch of fake flowers, a lamp and lampshade, and patience since it takes time to complete. Before we start, the video below is by theeasydiy from YouTube, so be sure to check out her channel if you enjoyed this video.
As you can see, the lampshade is beautiful and clearly eye-catching. It's very simple yet fancy at the same time. I hope that you all try it, because it's a great way to decorate a room and brighten it up! Lastly, this feminine and girly lampshade is quite inexpensive, especially if you already have a lamp. In the video, the lampshade only costs about $4, and the flowers can be found at the dollar store or any other retail store. That's all for this week, stay tuned for next week's post! And remember: the comment section is always open for tips, comments, and suggestions!
Saturday, March 16, 2013
Message on a wall
The craft calls for magazines, a pair of scissors, a marker, and either scotch or masking tape. All you really have to do is flip through a magazine until you find a page you like. When you find it, take your marker and draw a letter (make it big!) that is part of your message/word in block/bubble/cursive, and cut it out. Do the same with the rest of your letters. When your message is cut out, use tape to tape it on the wall. turn on a fan to make sure it is stuck on properly. For a better understanding, watch the video below, bye!
If you like the video, make sure you check out her channel: anatheglamdolll
Saturday, March 9, 2013
The Answer is in Your Hands...
Throughout their career, both Vincent Van Gogh and Leonardo da Vinci have done amazing work, yet people still have a question up in their heads, which one is better?
Vincent Van Gogh
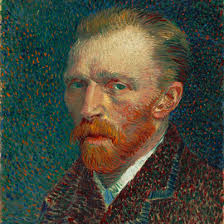 Vincent Willem Van Gogh was a Dutch post-impressionist artist, famous for his work in the 1800s. Although he had died at a very young age, it wasn't until his death that his paintings had become famous. During his career, Van Gogh's work was only known by a few, and appreciated by even less. He started to draw at an early age, but didn't pick up painting until his late 20's, completing some of his best-known works during the last two years of his life, before he died at the age of 37, on March 30, 1853. In just over a decade, Van Gogh had produced more than 2,100 artworks, consisting of 860 oil paintings and over 1,300 watercolors, drawings, sketches and paints. Some of his paintings include the famous "Starry Night", his collection of self portraits, "Bedroom in Arles", and "Starry Night over the Rhone."
Information from: http://en.wikipedia.org/wiki/Vincent_van_Gogh
Leonardo da Vinci
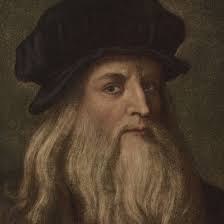 Leonardo di ser Piero da Vinci was an Italian Renaissance polymath: painter, sculptor, architect, musician, mathematician, engineer, inventor, anatomist, geologist, cartographer, botanist, and writer. He is widely considered to be the greatest painter of all time, and perhaps the most diversely talented person ever to have lives. Living to the age of 67, he had an interest in many things, but is still known widely for his best known paintings, that include the "Mona Lisa". Due to his new techniques, which were constant and frequently disastrous, though, only about fifteen of his paintings have survived. Throughout his art career, his interest in science had influenced him.
Information from: http://en.wikipedia.org/wiki/Leonardo_da_vinci
Chart
Still don't know who to chose? Here's a chart comparing the two artists.
1. Mona Lisa- Leonardo da Vinci
2. A Wheatfield with Cypresses- Vincent Van Gogh
2. The Last Supper- Leonardo da Vinci
3. Irises- Vincent Van Gogh
3. Head of a Young Women with Tousled Hair- Leonardo da Vinci
Vincent Van Gogh
Information from: http://en.wikipedia.org/wiki/Vincent_van_Gogh
Leonardo da Vinci
Information from: http://en.wikipedia.org/wiki/Leonardo_da_vinci
Chart
Still don't know who to chose? Here's a chart comparing the two artists.
| Vincent Van Gogh | Leonardo da Vinci |
| Famous after death | Famous before he died. |
| Over 2100 paintings | Only 15 paintings have survived to this day |
| Lived to 37 | Lived to 67 |
| Focused on mainly art | Famous for art but had many interests |
| Famous for Starry Night | Famous for Mona Lisa |
Top Three Paintings by Van Gogh and da Vinci
- Starry Night- Vincent Van Gogh
2. A Wheatfield with Cypresses- Vincent Van Gogh
2. The Last Supper- Leonardo da Vinci
3. Irises- Vincent Van Gogh
3. Head of a Young Women with Tousled Hair- Leonardo da Vinci
The Decision
Now that you've heard both sides of this argument, it's your time to choose. Whose the better artist out of the talented duo? Vincent Van Gogh or Leonardo da Vinci? Take the poll on the top right hand corner or comment below leaving your choice.
Subscribe to:
Posts (Atom)