Saturday, October 27, 2012

Weekend Topic!

Hey everyone! I know that I haven't been posting a lot, but starting now, there's going to be a new topic every weekend, which will be the topic throughout the week. Anyways, since today's the weekend, my topic for the week is ... hair. I know, you're probably thinking that hair isn't very artsy, but for me, it is. Throughout the week I will be post tutorial and tips on hairstyles, with the help of one of my all time favorite YouTube channels and inspirations, bebexo. Bebexo has some great tutorials, and I'm going to share some with you this week. Enjoy!

The hairstyle that we are going to be working on today is the famous hair bow. One thing that you will need is hair at least at your shoulders (hair where you can make a pony tail). This tutorial is very simple, quick, and cute. Another great thing is that you don't need to really buy anything. All you need is a pony tail holder, a comb/brush, and a few bobby pins. By the way, this hairstyle is convenient for all of you who are being Minnie Mouse for Halloween. I hope all of you enjoy the tutorial as much as I did. Let's get started!
I hope you enjoyed my post! Please comment on what you think, and follow this blog! That's all for now. Bye!

Wednesday, October 24, 2012

Mouth Art!

Introduction:
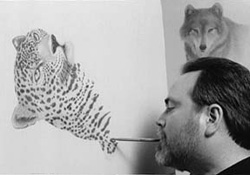
What do you think? Extreme art skills? Months for perfection? How long do you think that you would take to perfect this? Days, weeks, months? How about if you were holding the pencil in your mouth? Today I'm going to talk about Doug Landis, a mouth artist. Doug Landis is famous for doing the unbelievable: drawing with perfection with a pencil in his mouth  His general topic is sketching animals, with incredible details. The picture above is an example of one of his pieces. Enjoy! 

Information:
A high school wrestling accident rendered  Doug Landis
 a quadriplegic, paralyzed from the neck down. Concerned that Doug was spending too much time in front of the TV, his brother Monte challenged Doug to draw and placed a pencil in Doug’s mouth.Magic time.    (Information from:  http://bolstablog.wordpress.com/2011/04/17/teeth/  )

My Opinion:
As for me, it's hard enough to draw a picture like that with my hands. With my mouth, it might as well be impossible! I think that Doug Landis is really a great example of a true artist. One who has made a career despite all the difficulties that he has faced. One who hasn't given up. I personally find Doug Landis truly inspirational and I for one, look up to him. 

Extra: 
How do you think Doug Landis does it? Here's a picture that I found of him at work. Amazing, 
right? Anyway, don't forget to follow my blog! Also what do you think about Doug Landis? Feel free to leave me a comment on your opinion. That's all for now. Bye:D


Sunday, October 14, 2012

New Topic!

       What do you see in these pictures? Do you see an amazing, wild imagination, or maybe an underground world just waiting for you to step into? These pictures share something in common. They are both amazing, incredible masterpieces of chalk art, using one thing that just about every child loves to use to draw on the road...chalk! Chalk, just look how far something as simple as that can lead to! To create these kinds of unbelievable pictures, you will need four things: chalk, a lot of outdoor space, a huge imagination, and a lot of skill.

   As you can see, these pieces of art aren't something that you can achieve at one shot (unless you are very lucky), but these take a lot of time, especially since they are 3-D. For most of us, it's already hard enough to make a three dimensional drawing on paper, but with chalk, you can't even erase anything. If you mess up, you will most likely have to cover it up as best as you can, or you will have to start all over. Looking at these pictures, how long do you think that it would take to complete something like this? Five, ten, twelve hours? Days? It's true, they take a very long time to complete, but by looking at these, all I can say is that it is all worth it!


   What do you think about these pictures? Are they cool, unique, and incredible, or dumb, weird, and odd? Tell me what yo think in the comments below. Please follow my blog! That's all for now, bye!

Tuesday, October 9, 2012

Cinnamoroll Plushie!


Hey readers, today I will be teaching you how to make a cinnamoroll plushie. For those of you who don't know what that is, it's a Kawaii character created by Sanrio(the same company as Hello Kitty!) This post in made especially for my friend Jade who is obsessed with this little furry creature. This is going to be my last crafting post, so I hope that you enjoy it! This may be a little challenging for you at first, but remember, it's your first time, and practice makes perfect! Hope that you guys find this tutorial helpful:)


I personally think that this video is very helpful, and I hope that you do too! As for materials, I think that all of them are available at a local drugstore as well as department, and (obviously) craft stores. Even though I have not tried out the plushie yet, it seems like a fun project that (hopefully) doesn't take very long to do. Anyone who plans to, or ends up trying this out, please let me know how it turns out in the comment box below! Don't forget to follow me and continue viewing this blog.

I know that I haven't blogged for a while, and I'm sorry, but that's not going to continue. I was just a little busy, but now I plan on blogging at least three times a week, so there's going to be something new very soon! Also, remember that my next blog is going to be the start of a new topic, so don't forget to check that out as well! That's it for now, bye!


Tuesday, October 2, 2012

Ice Cream!

                                    Sweet Treats!
For those of you who liked my previous post, here's another hair accessory/pendant  for you to work on! In this particular video, we will be working on a simple felt-made ice-cream cone. This video will use up more materials than the other video, but most of the 
materials are house-hold items. Enjoy!

I personally love this video because the accessory is both very colorful, and easy to accomplish. The accessory is very fashionable and appeals to those who have a sweet tooth (like me!) As it says in the video, you can do many things with this felt. For example, you can turn it into a pendant for a necklace, attach it to a headband, glue it to a pin, etc. I hope you enjoyed this tutorial as much as I do, and try out this craft on your own. It's quick, cute, and cheap ... what have you got to lose?


Well, since my first video is about ice cream  I decided that my second one should be, as well! This tutorial is going to be about: how to make a Kawaii  ice cream cone plush from felt. This particular video is a little more challenging because it involves knowing how to stitch! For those of you who don't know how to stitch, I suggest that you ask someone to help instead of not trying this craft at all. I guarantee you, you will not be disappointed when you see the final results if they come out right! 

If anyone tries out any of the tasks that I have blogged about so far, please let me know by commenting! Also, in the comments below, please write me any suggestions on what to blog about next!   Don't forget to follow me! That's all for now, bye!


Monday, October 1, 2012

This week's Topic: Crafts!

                            Craft Time!

Hey readers, welcome back to a new week, new post, and most importantly, a new topic! This week, I decided to focus on crafting! Crafting is all about using materials, old and new, to make something great! From scrapbooks, to displays, crafting is everywhere! Today, I decided to start with something fairly simple. Today, we are going to learn how to make a bow out of ribbon like the one that you see in the picture above. This bow is a simple yet fun craft, and a cute accessory that matches with pretty much everything. Here are some materials that you will need to succeed in this craft: a roll of ribbon (I'd recommend 1 inch or thicker), a hot glue gun/fabric glue, and a pair of scissors. Let's begin!

 This bow will take no longer than 10 minutes to be done. I love these bows because not only are they really simple to make, but they can also be used for so many different reasons! For example, if you attach it to a bobby pin, it becomes a hair clip; if you attach it to a headband it adds a little fun to it, and it you attach to ribbon, it becomes a belt! These bows can be in any color, design, or size you want. Choose your ribbon, and good luck!


Please comment and tell me how you liked the video and if you tried it out, keep me informed on how it turned out. Don't forget to follow my blog! That's it for now, bye:D


Sunday, September 30, 2012

                                                   Weekend Nails!
 Since it's the weekend, and many people have plans, I decided to do show you some quick nail art designs that aren't time consuming, and very easy and quick to do. Let's begin!

Marble Nails
Marble nail art may not be the quickest  design, but it is definitely worth it!  The picture above is an example of how marble nails turn out. To achieve the look, you will need: masking/scotch tape, two or more nail polish colors of your choice, a bowl filled with water(room temperature), and a toothpick. A cotton swab dipped in nail polish remover also comes in handy!Click on the link for a tutorial:http://www.youtube.com/watch?v=U7bwL2S7auk
Good luck!

Sally Hansen
For those of you that have absolutely no time to even put on a simple base coat, the Sally Hansen Real Nail Polish Strips are for you! With these nail strips, you can have perfect nails in seconds! These nail strips last up to 10 days,and are easily removable with nail polish remover. Also, you don't need to wait for them to dry, and you can get them in 40 different styles! Here are three easy steps for applying these nail strips:
1. Take a nail strip of your choice and line it up with the bottom of your nail. 
2. Press down on nail strip on all sides of your nail.
3. Yank off  the extra nail strip and there you have it! Instant dry nails!
For more information, click on the link below.
http://sallyhansen.com/products/nails/nail-color/salon-effects-real-nail-polish-strips

Salon Express Nail Design Kit
Most of you have probably seen an advertisement for this on TV, but if you haven't gotten it yet, hit the stores! For just $9.99, you can get one scraper, one holder, and five design plates which you can use over and over again! From flowers, to stripes, to animal print, you'll have perfect nails in seconds! Here are some simple steps on how to use the product:
1. Take a nail polish color of your choice and apply it on a design of your choice.
2. Take the scraper and slide it across the nail polish. Grab the roller and place it upon the plate where your design is. Pick it up and check to make sure if the design is on the roller.
3. Roll the roller onto your fingernail. 


Here's a link where you can purchase the kit: http://www.shopko.com/detail/salon-express-nail-design-kit/35248?gclid=CNup3pCv3rICFYuY4Aod8ngA5A#

 All the links that I have posted, are also the links that I have used to get information. I hope this post helped you all! Please follow me and comment! That's all for now. Bye!